In this post we will deploy the azure infrastructure to have an storage account queue. For this we will use terraform which can be downloaded from here.
Before start, we need a few prerequisites, these are the following:
- Installing terraform, azure-cli and azure-storage-queue
- Create a service principal for deploying the resources with terraform
- Creating the terraform tf file with all the components required to be deployed. These include:
- A Resource Group
- A Storage account
- A queue inside the previous storage account
- Run the terraform deployment
- Write the python code to send a message and retrieve it from the queue created in the storage account (Part II)
Let’s start!
Before starting to work with terraform, we need to install terraform. We can do it easily downloading it from the official website and placing it in the path of our sysvars. We can download the latest packaged binary from here.
To install azure-cli and azure-storage-queue we can use python + pip. If you dont have python, you can download it from the official website here. Make suire you install pip as well as part of the installation process.
Once python is setup we can run the following to install the packages and it’s dependencies:
pip install azure-cli azure-queue-storageAfter installing the packages we are good to start moving to point 2. For the service principal creation we can use the recently installed azure-cli. The call to create the spn is as follows:
az ad sp create-for-rbac --name="SPForTerraform" --role="Contributor" --scopes="/subscriptions/ourSubscriptionId"Make sure you replace ourSubscriptionId by your azure subscription. In case you dont know where to obtain it you can follow the following procedure or this one. The spn we will create will be named with the –name parameter and will have the contributor role. This means this spn will have access to everything but to manage users. So we can create any sort of resouce with in. This process may take a few seconds, after a while we should see something like this:
Changing "SPForTerraform" to a valid URI of "http://SPForTerraform", which is the required format used for service principal names
Creating a role assignment under the scope of "/subscriptions/xxxxxx"
  Retrying role assignment creation: 1/36
  Retrying role assignment creation: 2/36
  Retrying role assignment creation: 3/36
The output includes credentials that you must protect. Be sure that you do not include these credentials in your code or check the credentials into your source control. For more information, see https://aka.ms/azadsp-cli
{
  "appId": "xxxxxx",
  "displayName": "SPForTerraform",
  "name": "http://SPForTerraform",
  "password": "yyyyyy",
  "tenant": "zzzzzz"
}
Make sure you protect these, as anybody getting them will be able to access your tenant and start deploying resources in it.
Now, we can move to the thid point which is creating the terraform file. We can start now our preferred editor and create a *.tf file with the following content:
provider "azurerm" {
subscription_id = "kkkkkk"
client_id = "xxxxxx"
client_secret = "yyyyyy"
tenant_id = "zzzzzz"
features {}
}

terraform {
  required_version = ">= 0.13"
  required_providers {
    azurerm = {
      source = "hashicorp/azurerm"
    }
  }
}
The first block initializes the provider azurerm from terraform, while the second one initializes the terraform file with the required azurerm providrer, and tells terraform where to obtain it and which is the minimum version required. client_id is the same as the appID returned by the az cli when the spn was created.
Then we need another three blocks, one for each resource we want to deploy:
resource "azurerm_resource_group" "rg1" {
name = "TerraformRG"
location = "West Europe"
tags = { Owner = "Albert Nogues" }
}

resource "azurerm_storage_account" "sacc1" {
  name                     = "teststorageacc1"
  resource_group_name      = azurerm_resource_group.rg1.name
  location                 = azurerm_resource_group.rg1.location
  account_tier             = "Standard"
  account_replication_type = "LRS"
}

resource "azurerm_storage_queue" "queue1" {
  name                 = "queue1"
  storage_account_name = azurerm_storage_account.sacc1.name
}
The way terraform blocks work is the following:
resource “name_of_the_azurerm_resource” “our_alias”{
… parameters and vars…
}
We can use then the alias to select things from other blocks we defined previously. So for example, in our example, the storage account, takes the location from the location field defined in the resource group, this way we ensure we create the storage accoun in the same azure location than the resource group (even it’s not mandatory). An example of how to define an storage account can be found in the official documentation here.
The same with the queue, which is created in the storage_account_name referred by the previous block. We can also put tags to the resources as shown in the resource group block.
Once we are ready, we can launch terraform to create our resources. For security purposes (and if working in multiple environments) it’s usually not good having in the code the client_id, secret_id, tenant_id and subcription_id. Terraform can read system variables in execution time. These can be set (windows) or exported (linux) with these names:
ARM_SUBSCRIPTION_ID
ARM_CLIENT_ID
ARM_CLIENT_SECRET
ARM_TENANT_ID
Once all ready we can trigger our creation script. We can navigate where our .tf form is and launch it:
terraform planWhich will give us the changes needed in our azure subscription to acommodate the resources, and it should show us three changes: one for the resource group, another for the storage account and another for the queue:
terraform.exe plan

azurerm_resource_group.rg: Refreshing state... [id=/subscriptions/kkkkkk/resourceGroups/TerraformRG]

An execution plan has been generated and is shown below.
Resource actions are indicated with the following symbols:
  + create

Terraform will perform the following actions:

  # azurerm_resource_group.rg1 will be created
  + resource "azurerm_resource_group" "rg1" {
      + id       = (known after apply)
      + location = "westeurope"
      + name     = "TerraformRG"
      + tags     = {
          + "Owner" = "Albert Nogues"
        }
    }

  # azurerm_storage_account.sacc1 will be created
  + resource "azurerm_storage_account" "sacc1" {
      + access_tier                      = (known after apply)
      + account_kind                     = "StorageV2"
      + account_replication_type         = "LRS"
      + account_tier                     = "Standard"
      + allow_blob_public_access         = false
      + enable_https_traffic_only        = true
      + id                               = (known after apply)
      + is_hns_enabled                   = false
      + large_file_share_enabled         = (known after apply)
      + location                         = "westeurope"
      + min_tls_version                  = "TLS1_0"
      + name                             = "teststorageacc1"
      + primary_access_key               = (sensitive value)
      + primary_blob_connection_string   = (sensitive value)
      + primary_blob_endpoint            = (known after apply)
      + primary_blob_host                = (known after apply)
      + primary_connection_string        = (sensitive value)
      + primary_dfs_endpoint             = (known after apply)
      + primary_dfs_host                 = (known after apply)
      + primary_file_endpoint            = (known after apply)
      + primary_file_host                = (known after apply)
      + primary_location                 = (known after apply)
      + primary_queue_endpoint           = (known after apply)
      + primary_queue_host               = (known after apply)
      + primary_table_endpoint           = (known after apply)
      + primary_table_host               = (known after apply)
      + primary_web_endpoint             = (known after apply)
      + primary_web_host                 = (known after apply)
      + resource_group_name              = "TerraformRG"
      + secondary_access_key             = (sensitive value)
      + secondary_blob_connection_string = (sensitive value)
      + secondary_blob_endpoint          = (known after apply)
      + secondary_blob_host              = (known after apply)
      + secondary_connection_string      = (sensitive value)
      + secondary_dfs_endpoint           = (known after apply)
      + secondary_dfs_host               = (known after apply)
      + secondary_file_endpoint          = (known after apply)
      + secondary_file_host              = (known after apply)
      + secondary_location               = (known after apply)
      + secondary_queue_endpoint         = (known after apply)
      + secondary_queue_host             = (known after apply)
      + secondary_table_endpoint         = (known after apply)
      + secondary_table_host             = (known after apply)
      + secondary_web_endpoint           = (known after apply)
      + secondary_web_host               = (known after apply)

      + blob_properties {
          + cors_rule {
              + allowed_headers    = (known after apply)
              + allowed_methods    = (known after apply)
              + allowed_origins    = (known after apply)
              + exposed_headers    = (known after apply)
              + max_age_in_seconds = (known after apply)
            }

          + delete_retention_policy {
              + days = (known after apply)
            }
        }

      + identity {
          + principal_id = (known after apply)
          + tenant_id    = (known after apply)
          + type         = (known after apply)
        }

      + network_rules {
          + bypass                     = (known after apply)
          + default_action             = (known after apply)
          + ip_rules                   = (known after apply)
          + virtual_network_subnet_ids = (known after apply)
        }

      + queue_properties {
          + cors_rule {
              + allowed_headers    = (known after apply)
              + allowed_methods    = (known after apply)
              + allowed_origins    = (known after apply)
              + exposed_headers    = (known after apply)
              + max_age_in_seconds = (known after apply)
            }

          + hour_metrics {
              + enabled               = (known after apply)
              + include_apis          = (known after apply)
              + retention_policy_days = (known after apply)
              + version               = (known after apply)
            }

          + logging {
              + delete                = (known after apply)
              + read                  = (known after apply)
              + retention_policy_days = (known after apply)
              + version               = (known after apply)
              + write                 = (known after apply)
            }

          + minute_metrics {
              + enabled               = (known after apply)
              + include_apis          = (known after apply)
              + retention_policy_days = (known after apply)
              + version               = (known after apply)
            }
        }
    }

  # azurerm_storage_queue.queue1 will be created
  + resource "azurerm_storage_queue" "queue1" {
      + id                   = (known after apply)
      + name                 = "queue1"
      + storage_account_name = "teststorageacc1"
    }

Plan: 3 to add, 0 to change, 0 to destroy.

------------------------------------------------------------------------

Note: You didn't specify an "-out" parameter to save this plan, so Terraform
can't guarantee that exactly these actions will be performed if
"terraform apply" is subsequently run.
Once we confirm this is the change we want and all is in order we can run terraform apply:
terraform.exe apply
...
...
...
Plan: 3 to add, 0 to change, 0 to destroy.

Do you want to perform these actions?
  Terraform will perform the actions described above.
  Only 'yes' will be accepted to approve.

  Enter a value: yes
We say yes and let’s go!
It may happen that there is some error, like a taken name, in this case we will get an error:
Error: Error creating Azure Storage Account "teststorageacc1": storage.AccountsClient#Create: Failure sending request: StatusCode=0 -- Original Error: autorest/azure: Service returned an error. Status=<nil> Code="StorageAccountAlreadyTaken" Message="The storage account named teststorageacc1 is already taken."

  on terraformTest.tf line 48, in resource "azurerm_storage_account" "sacc1":
  48: resource "azurerm_storage_account" "sacc1" {
We can fix it and rerun again, and the resources that were created already will not be modified (like in this case the resource group).
azurerm_storage_account.sacc1: Creating...
azurerm_storage_account.sacc1: Still creating... [10s elapsed]
azurerm_storage_account.sacc1: Still creating... [20s elapsed]
azurerm_storage_account.sacc1: Creation complete after 21s [id=/subscriptions/kkkkkk/resourceGroups/TerraformRG/providers/Microsoft.Storage/storageAccounts/teststorageacc1anogues]
azurerm_storage_queue.queue1: Creating...
azurerm_storage_queue.queue1: Creation complete after 0s [id=https://teststorageacc1anogues.queue.core.windows.net/queue1]

Apply complete! Resources: 2 added, 0 changed, 0 destroyed.
Now we can either call the cli or browse through the azure portal to confirm that the storage account was created and the queue inside it:
az storage account list
[
  {
    "accessTier": "Hot",
    "allowBlobPublicAccess": false,
    "azureFilesIdentityBasedAuthentication": null,
    "blobRestoreStatus": null,
    "creationTime": "2020-12-23T18:30:49.007107+00:00",
    "customDomain": null,
    "enableHttpsTrafficOnly": true,
    "encryption": {
      "keySource": "Microsoft.Storage",
      "keyVaultProperties": null,
      "requireInfrastructureEncryption": null,
      "services": {
        "blob": {
          "enabled": true,
          "keyType": "Account",
          "lastEnabledTime": "2020-12-23T18:30:49.085263+00:00"
        },
        "file": {
          "enabled": true,
          "keyType": "Account",
          "lastEnabledTime": "2020-12-23T18:30:49.085263+00:00"
        },
        "queue": null,
        "table": null
      }
    },
    "failoverInProgress": null,
    "geoReplicationStats": null,
    "id": "/subscriptions/kkkkkk/resourceGroups/TerraformRG/providers/Microsoft.Storage/storageAccounts/teststorageacc1anogues",
    "identity": null,
    "isHnsEnabled": false,
    "kind": "StorageV2",
    "largeFileSharesState": null,
    "lastGeoFailoverTime": null,
    "location": "westeurope",
    "minimumTlsVersion": "TLS1_0",
    "name": "teststorageacc1anogues",
    "networkRuleSet": {
      "bypass": "AzureServices",
      "defaultAction": "Allow",
      "ipRules": [],
      "virtualNetworkRules": []
    },
    "primaryEndpoints": {
      "blob": "https://teststorageacc1anogues.blob.core.windows.net/",
      "dfs": "https://teststorageacc1anogues.dfs.core.windows.net/",
      "file": "https://teststorageacc1anogues.file.core.windows.net/",
      "internetEndpoints": null,
      "microsoftEndpoints": null,
      "queue": "https://teststorageacc1anogues.queue.core.windows.net/",
      "table": "https://teststorageacc1anogues.table.core.windows.net/",
      "web": "https://teststorageacc1anogues.z6.web.core.windows.net/"
    },
    "primaryLocation": "westeurope",
    "privateEndpointConnections": [],
    "provisioningState": "Succeeded",
    "resourceGroup": "TerraformRG",
    "routingPreference": null,
    "secondaryEndpoints": null,
    "secondaryLocation": null,
    "sku": {
      "name": "Standard_LRS",
      "tier": "Standard"
    },
    "statusOfPrimary": "available",
    "statusOfSecondary": null,
    "tags": {},
    "type": "Microsoft.Storage/storageAccounts"
  }
]
And then confirming the storage account has been created we can check the queue inside:
az storage queue list --account-name teststorageacc1anogues

There are no credentials provided in your command and environment, we will query for the account key inside your storage account.
Please provide --connection-string, --account-key or --sas-token as credentials, or use `--auth-mode login` if you have required RBAC roles in your command. For more information about RBAC roles in storage, visit https://docs.microsoft.com/en-us/azure/storage/common/storage-auth-aad-rbac-cli.
Setting the corresponding environment variables can avoid inputting credentials in your command. Please use --help to get more information.
[
  {
    "approximateMessageCount": null,
    "metadata": null,
    "name": "queue1"
  }
]
And we confirmed all is ready for our second part!
It’s time to move to azure-storage-queue python library for our 5th step. There are different ways to authenticate to the queue. Either we use the QueueServiceClient or the QueueService. the differences between both are in their official documentation here.
The easiest way albeit not the recommended one is to use the queue key, or even better, we can grab the connection string directly from the queue keys section. Be aware that this allows to do virtually all with that queue. So don’t lose this key, and if you do, rotate them and generate new ones.
Just open a new python file and to write a sync message use the following code:
from azure.storage.queue import QueueClient

queue = QueueClient.from_connection_string(conn_str="DefaultEndpointsProtocol=https;AccountName=teststorageacc1anogues;AccountKey=xxxxxx;EndpointSuffix=core.windows.net", queue_name="queue1")

queue.send_message("Hello World!")
This will send a Hello World message to our queue. If we print the output received we should see some debug info like the following:
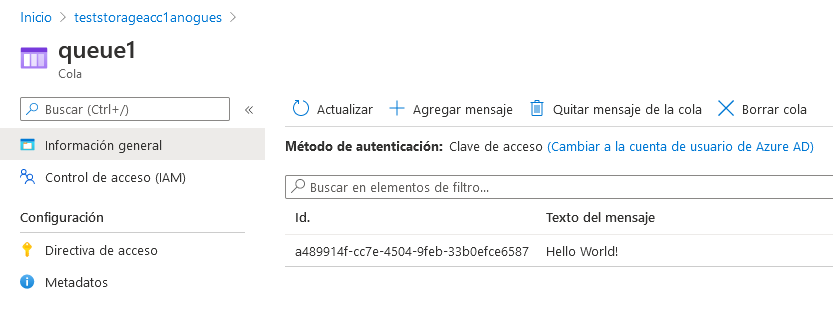
{'id': 'a489914f-cc7e-4504-9feb-33b0efce6587', 'inserted_on': datetime.datetime(2020, 12, 24, 19, 21, 20, tzinfo=datetime.timezone.utc), 'expires_on': datetime.datetime(2020, 12, 31, 19, 21, 20, tzinfo=datetime.timezone.utc), 'dequeue_count': None, 'content': 'Hello World!', 'pop_receipt': 'AgAAAAMAAAAAAAAA727vbgja1gE=', 'next_visible_on': datetime.datetime(2020, 12, 24, 19, 21, 20, tzinfo=datetime.timezone.utc)}Now if we do not believe the message has arribed properly to the queue, we can go to the azure portal and check by ourselves. For this, we find ou storage account, click in queues and on queue1 (or whatever name you choose in terraform) and you should see the message along with the arrival time and the expiry time (by default, 7 days from now on)

Let’s see how to retrieve that message from python now. Remember that storage account queues do not delete the processed messages so If you do not delete them they will stay until expiration (even they will stay “hidden” for 90 seconds by default unless you pass other parameter) , so make sure your call deletes the message once processed (in this case read):
messages = queue.receive_messages()

for msg in messages:
    print(msg.content)
    queue.delete_message(msg)
And this will output our message:
Hello World!If you want to only see your message without actually “reading it” you can use the peek function. This will not mark your message as “seen” and will be returned by any other consumer reading the queue or any retry you do.
If we go back to the azure portal and check the queue we should see the message is not there anymore. We can also delete the messages from the azure portal,a s well as create them directly there.
To improve our code a little bit we can use SAS keys instead of the storage account master keys. You can generate a SAS token directly from python with the following code:
from datetime import datetime, timedelta
from azure.storage.queue import QueueServiceClient, generate_account_sas, ResourceTypes, AccountSasPermissions

sas_token = generate_account_sas(
    account_name="<storage-account-name>",
    account_key="<account-access-key>",
    resource_types=ResourceTypes(service=True),
    permission=AccountSasPermissions(read=True),
    expiry=datetime.utcnow() + timedelta(hours=1)
)

queue_service_client = QueueServiceClient(account_url="https://<my_account_name>.queue.core.windows.net", credential=sas_token)
But you still need to have your credentials inside the code. So the safest way to manage it is to create the SAS token from somewhere else with a caducity not long in the future and use this in your code, or use environment variables for passing sensitive information to your code. With the os library in python you can read them and use inside your code, without having to be written there and exposing them in your code or git.
For more information you can check microsoft official documentation here, the quickstart guide here or the pypi page here.


